
Create Name Server, IP Address and DOMAIN on WINDOWS Server 2008
Berikut adalah Tutorial tentang membuat Name Server, IP Address dan Join DOMAIN di WINDOWS SERVER 2008 via REMOTE DESKTOP CONNECTION.
Langkah-langkahnya yaitu :
1. buka "RUN" dan ketikkan "MSTSC", maka akan terbuka sebuah REMOTE DESKTOP CONNECTION.
Langkah-langkahnya yaitu :
1. buka "RUN" dan ketikkan "MSTSC", maka akan terbuka sebuah REMOTE DESKTOP CONNECTION.

2. Setelah muncul Remote Desktop Connection, drag ke bawah OPTIONS hingga muncul tampilan yang lebar, dan isikan IP Address REMOTE SERVER anda. Berikut adalah gambar contohnya :

3. Pada Account ADMINISTRATOR, masukkan password Remote Server anda.

4. jika sebelumnya pada Komputer anda belum terdapat SERTIFIKAT tentang REMOTE SERVER tersebut, maka silahkan mendownload SERTIFIKAT REMOTE SERVER tersebut dengan memilih tombol YES.

5. Anda akan langsung dihadapkan pada tampilan DESKTOP REMOTE SERVER WINDOWS 2008.
kira-kira seperti inilah tampilan desktopnya :

6. Pada halaman SERVER MANAGER, pilih menu "CHANGE SYSTEM PROPERTIS" dan Settinglah NAME COMPUTER SERVER anda. Berikut contoh gambarnya :

7. Restart your remote computer and CONGRATS, you have been CREATE NAME SERVER successfully.
8. Langkah selanjutnya adalah CREATE IP Address Remote Computer Server.
Langkah-langkah pembuatannya akan lebih jelas jika kita melihat gambar dibawah ini :

Explanation : Choice "View Network Connections" menu and than right click on Local Area Connection and choose Properties menu. After that DISABLE IPV6 and on IPV4, choice Properties menu and setting your IP Address Static.
9. Langkah kali ini adalah melakukan penyettingan terhadap TIME and DATE REGIONAL.
klik kiri pada menu JAM yang berada di pojok kanan bawah. setelah itu pilih menu Change Date and Time Settings.
9. Langkah kali ini adalah melakukan penyettingan terhadap TIME and DATE REGIONAL.
klik kiri pada menu JAM yang berada di pojok kanan bawah. setelah itu pilih menu Change Date and Time Settings.

10. Aktivasi atas Product WINDOWS SERVER yang anda pergunakan.

11. Update your Windows Server 2008.

----

----

-----
KONFIGURASI UPDATE TINGKAT LANJUT
Berikut adalah settingan untuk tingkat lanjut dari update Microsoft windows server 2008 yang bertujuan untuk proses maintenance.
Klik Configure Updates dan pada menu Control panel home pilih ChangeSettings option.
Klik Configure Updates dan pada menu Control panel home pilih ChangeSettings option.

--------

kita sengaja memilih option Check for update but let me choose whether to download and install them tujuannya agar TIDAK SEMUA UPDATE dari microsoft kedepannya tidak kita install di server kita. Hal ini tentu saja berkaitan dengan space harddisk dari server kita yang akan terpakai untuk instalasi updating tersebut.
12. Setelah Update Windows Server 2008 and restart Windows Servernya, kita akan melakukan Konfirgurasi terhadap Remote Desktopnya. Tujuannya adalah untuk mempermudah kita sebagai engineer IT dalam menghandle Problem yang terjadi dikemudian hari, atau hanya sebatas untuk proses Maintenance. Penjelasan mengenai langkah-langkah konfigurasinya dapat diperoleh berdasarkan gambar berikut ini :
12. Setelah Update Windows Server 2008 and restart Windows Servernya, kita akan melakukan Konfirgurasi terhadap Remote Desktopnya. Tujuannya adalah untuk mempermudah kita sebagai engineer IT dalam menghandle Problem yang terjadi dikemudian hari, atau hanya sebatas untuk proses Maintenance. Penjelasan mengenai langkah-langkah konfigurasinya dapat diperoleh berdasarkan gambar berikut ini :

13. Instalasi terhadap Active Directory Domain Service
Instalasi ini bertujuan untuk membuat sebuah DOMAIN CONTROLLER yang berfungsi untuk menghandle service - service pada Database Active Directory.
Berikut adalah prosedure dari pembuatan Domain Controller:
Pada Halaman Server manager klik Menu "ROLES" hingga muncul halaman Roles Summary.
Di halaman Roles Summary pilih "ADD ROLES" seperti gambar berikut ini :

Setelah kita berada di halaman Server Role, terdapat banyak option yang boleh kita install dengan cara men-check-listnya. Namun yang kita butuhkan hanya men-checklist option "Active Directory Domain Service".

Saat kita menekan tombol NEXT, kita akan dibawa ke halaman Informasi mengenai Pengenalan terhadap Active Directory Domain Service.

Skip halaman ini dan langsung saja menekan tombol Next.
Berikut adalah sambutan setelah kita menekan tombol NEXT :

Klik tombol Install untuk menginstall Domain Service yang kita butuhkan.

Setelah kita berhasil menginstall Domain Service tersebut, maka tampilannya akan berubah menjadi seperti ini :

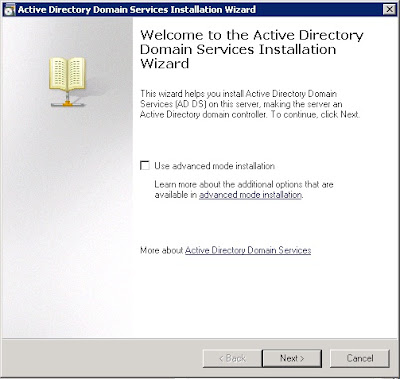
14. Instalasi DCPROMO.
setelah semua hal selesai kita lakukan, maka langkah akhir yang harus kita lakukan adalah Instalasi DCPROMO. tanpa instalasi hal ini, maka server yang kita buat belum berhasil membuat sebuah DOMAIN CONTROLLER yang bisa menjalankan DOMAIN SERVICE di Active Directory.
Berikut adalah langkah-langkah dari instalasi DCPROMO.
Buka start menu windows server 2008 anda dan ketikkan "DCPROMO" dibagian searching (tanpa tanda kutip). Maka akan muncul sebuah tampilan gambar seperti berikut ini :

nah, selanjutnya saat kita berada di halaman AD Domain Service Installation, kita cukup SKIP bagian ini (tanpa menchecklist menu USE ADVANCE MODE). jadi hanya menekan tombol NEXT saja.
sama halnya dengan bagian atas, pada bagian Operating System Compatibility kita juga cukup untuk melakukan SKIP bagian ini. Dengan cara langsung menekan tombol NEXT.

Nah, sekarang kita berada di halaman Create New Domain.
Di halaman ini terdapat 2 pilihan antara membuat sebuah DOMAIN BARU atau memilih DOMAIN yang telah kita buat (domain lama). Karena pada tutorial kali ini kita berada di kondisi DOMAIN yang belum terset-up, maka kita akan memilih "CREATE A NEW DOMAIN IN NEW FOREST".
nah pada kolom FQDN (Fully Qualified Domain Name), kita bisa mengisikan nama DOMAIN dengan contoh " LATIHAN.SERVER.COM ".

Dan pada Forest Functional page nya, kita wajib memilih OS sesuai dengan OS yang kita install, yaitu dalam hal ini windows server 2008 R2.

setelah kita menekan tombol next, maka kita akan berada di halaman Additional Domain Controller. meskipun ada beberapa pilihan, namun kita hanya bisa memilih DNS Server sebagai additional options nya untuk Domain Controller. hal ini semata-mata karena kita masih dalam tahap pembuatan Domain Controller. Jika ada keterangan tentang delegation, maka kita harus menekan tombol YES untuk melanjutkannya.

selanjutnya, halaman yang 1 ini adalah halaman tempat penyimpanan program instalasi kita (Location installation disk). Jika kita memilih default dari location installation disk, maka biarkan saja informasi yang ada dan kita tinggal memilih tombol NEXT.

Jika sudah, buatlah password untuk Domain Controller tersebut.

Akan ditampilkan halaman yang menyatakan tentang simpulan atas settingan kita.

selanjutnya komputer windows server 2008 R2 akan membuat Active directory domain service. proses ini mungkin akan memakan waktu 3 hingga 5 menit. Jangan lupa untuk memberikan check list pada checkbox reboot on completion.

15. Pembuatan User baru sekelas Administrator
Berikut adalah langkah-langkah yang dipergunakan untuk membuat user baru dengan level sesama administrator.
Penjelasan lebih lengkap berada di gambar berikut ini, jadi perhatikan baik-baik gambar berikut, terutama tentang LETAK Direktory FOLDER.

Ubah Username Administrator menjadi username baru, misal = adminfirman . Dan selanjutnya tekan YES jika ada informasi mengenai After Renaming.

Isikan data-data berikut pada Kolom Box. Perhatikan Domainnya.

Setelah selesai, langkah selanjutnya adalah RESET PASSWORD atas Account tersebut.
metodenya sama dengan metode diatas, tinggal klik kanan dan pilih menu RESET PASSWORD.

Isikan Password baru anda.
INGAT = PASSWORD HARUS BERISI NAMA, ANGKA dan SYMBOL.

jika berhasil, akan ada keterangan seperti dibawah ini :

Untuk melihat Hasilnya, silahkan restart windows server 2008 R2 anda dan masuk ke dalam REMOTE DESKTOP. Pilih menu USE ANOTHER ACCOUNT dan isikan dengan account adminfirman dengan PASSWORD = administrator.1


